

Why bother with a 2-piece placket? Beyond that it's fast, easy and can be done completely at the machine, countless design opportunities exist. Because the overlap and underlap are separates pieces, they can be cut from different fabrics and the directions of the grainline of one or both pieces can be changed to achieve a unique look.
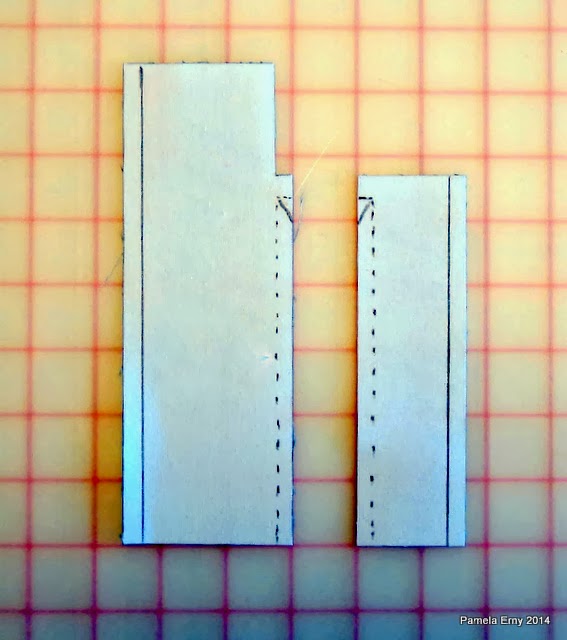
Rather than a one piece placket made from a single square piece ot fabric with an array of fussy difficult angles and edges to turn, this method uses 2 rectangles to which a single seam allowance is added to one side of each piece. The 2 simple pattern pieces are shown below on a 1" grid for you to copy.
Now let's make a perfect placket!
(Please note that I am writing this tutorial as if you have never made a sleeve placket before. I am going to show it to you one very detailed step at a time with many detailed photos. So, at first glance it may seem complicated, but in reality after your first practice-placket it just takes 5 minutes --or even less-- to complete)
First, you will notice that I am demonstrating this method using two rather "soft and spongy" quilting cottons that are not of the best quality... not bad, but rather thick as compared to traditonal shirting fabric. Why? It was a good way to clearly show the right and wrong sides of the fabrics for demonstration purposes, and I wanted you to see that even on lower-priced fabrics, you can get great results.
PLACKET PATTERN-- grid is 1" square.
On Placket Pattern- Broken lines are stitching
lines, solid lines are fold lines,
angle lines are slash lines.
angle lines are slash lines.
NOTE--
Pattern and Slit Length are based on a 1/4" sleeve-to-cuff seam allowance.
If your pattern has 5/8" seam allowances, lengthen the Placket Pattern (at the bottom by about 3/8", and cut the sleeve-slit about 3/8" longer. That said, please remember the length and width of the placket (and accompanying slit in the sleeve) is not set in stone. Make a sample placket and change the dimensions if you want to do so.
Cut the PLACKET Pieces from fabric--- Cut 2 of the larger (overlap) placket, right sides together. Cut 2 of the smaller (underlap) placket, right sides together. Try very hard to cut them as straight as possible.

Now Place one Sleeve
WRONG side up, and cut the slit that was marked on your pattern piece. Cut it 5" long. Yes really, cut it now...trust me, I know what I am doing. <smile>

Next, the placket pieces will be sewn to the sleeve slit...RIGHT SIDE of Placket to WRONG side of SLEEVE.
An easy way to remember this at this stage is that ALL
of your pieces, Sleeve and both Placket Pieces will be WRONG Side
Up. So....if all you see facing up at you are the wrong sides of everything....you
are doing it right!
Pam's Tip-- Remember that in every single sleeve
placket that you will ever sew-- The “Little” Under-lap placket
piece will be placed on the “Little Side” of the slit (where
there is only a “Little” bit of fabric toward the edge of the back
side of the sleeve), and the “Big” Over-lap Placket piece will be
placed on the “Big Side” of the slit (where there is a “Big”
amount of fabric toward the edge of the front of the sleeve.) So if
you always have these 2 things in mind,your plackets will be sewn
correctly--
- Little placket goes on the Little Side, Big Placket goes on the Big Side.
- Everything you see you at this point is Wrong side up.
Let's Stitch!

Stitch the (little) under-lap placket piece to the
sleeve-slit, matching the stitching line edge of the placket piece to
the sleeve slit, as shown above.
You will start from the bottom and then
stitch until you are 1/4” above the end of the slit, then pivot and
sew to the edge of the placket piece as shown (and this is why we cut the slit first...it so easy to align cut edge to cut edge...no guessing). Remember...everything you see is wrong side up!
Then match the stitching-line edge of the (big)
over-lap placket piece to the other side of the slit,as shown above. Again...remember that everything you see is wrong side up!

At the machine, drop your needle into the *Corner*
of the previously stitched (little) Under-Placket shown above. (Have you noticed that everything is still WRONG side up? <smile> )

Then stitch across and onto the (bigger) Over-lap Placket
piece, as shown above. Stop stitching when you are 1/4” past the cut edge, then
pivot and sew down the remaining side of the sleeve-slit, matching
edge of placket to edge of slit, stitching a 1/4” seam.

(Please ignore that stray cut piece of
thread....it means nothing but sloppy photography....sorry)
Now snip from the center into the corners (through all thicknesses) as
shown. It is essential to snip into the corners as close to the
stitching as possible, even if you snip a teeny-tiny bit past the corner
stitches! Otherwise you will have a puckered placket...and we don't
want a puckered placket, now do we? So be brave and SNIP!

Then as shown above, bend the snipped triangle up, and crease it
with your fingernail, or press it in place with an iron.

Now turn everything through the slit to the RIGHT side
of the sleeve. Now we will be working from the RIGHT side of our
sleeve. In each of the following steps, you will be seeing and
working from the RIGHT Side of the Sleeve.
Pam's Tip--
Look! The Little Placket is still on the Little
Side of the Sleeve, and the Big Placket is still on the Big Side of
the Sleeve...always remember that, and you won't mix them up!

Move the (little)
Under-placket so that you can see the top of the stitching line
(which is the bottom of the slashed triangle), and mark a (removable)
line that is about 1-2" long as shown above.. It will be used a reference point
later. You can see my yellow chalked line in the photo, above.

As shown above, flip the “Big”
part of the sleeve up and out of the way so the Under-Placket is
exposed. This will make it easier to work with as we continue.

Press the seam
allowances toward the placket-piece, as shown above. You can do this with
an iron, or as many professionals do....by briskly stroking the allowances a few times with a fingernail.

Then fold the free edge by
1/4” as shown above, and press it (or crease it firmly with your fingernail).

Next as shown above, fold the placket over
so that the edge (that you just folded by 1/4” and creased), barely
covers the line of stitches. Press the newly turned edge firmly with an iron or your fingernail.

Finish constructing the
Placket Under-Lap as shown above, by stitching it closed as close to outer edge as
possible. Notice that this stitching extends just above the yellow chalk line.

Bring the previously
“flipped out of the way” part of the sleeve back down (covering
the completed under-lap) so that the (big) Overlap Placket and its
stitching is visible, as shown above.
Then, like was done with the
Under-placket, mark a (removable) line at the top of the stitching
line (which is the bottom of the slashed triangle).
It will be used a reference
point later. You can see my yellow chalked line in the photo, above.

Just like what was done with
the (little) Placket Under-lap...Press (or crease) the seam allowance
toward the placket-piece, and then fold the free edge by 1/4” and
press it (or crease it firmly with your fingernail).
^ When these steps are
complete, it will look like the photo, above ^

Next as shown above, fold the placket over
so that the edge (that you just folded by 1/4” and creased),
barely covers the line of stitches. Press with iron or crease with fingernail.
Notice the chalked lines,
they will be used soon...but next the “peak” at the top of the
(big) Placket Over-lap will be folded.
FOLDING THE PEAK --

Note—either side can be folded first)
Fold one side of the top of
Placket UNDER at an approximate 45-degree angle.
Don't let me lose you here,
it's easy...the following photos will make it more clear. For now,
just finger-fold one side under at an angle, but do NOT press/crease
it...yet. It should look (approximately) like this next photograph--

See the photo above? That was easy...one side
folded under!

Now.....fold the other side
UNDER the first fold.. After the this second fold, your
“placket-peak” will look approximately like this next
photograph--

The angles on the “peak”
shown above are pretty good, but I fiddled with one fold for a few seconds until the
angles were as perfectly even as my eyes could detect. In other
words, no one gets “perfect” peaks unless you have one of those
$$$$ auto-folding machines that they use at production shirt
factories. But you can get very very close by eye....and if
you want to use a triangle shaped cardboard template, go ahead...I just prefer not to.

While I don't usually use
templates, I do use a glue stick in some cases to make my
shirt-making life a little easier. So, after you are happy with your
folded peak and have pressed the creases (with an iron or your
fingernail)...feel free to dab a bit of glue-stick on the underside
of the peak. A little goes a long way...just a quick light dab...away
from the edges, fold it back up and then just “finger-press” it
down.
The
photograph below is here to make certain that THIS edge...the side that
covers the seam allowances...is the one that will be stitched closed when we finish the placket.

Now
let's finish this Sleeve Placket!

As shown above....DROP
YOUR NEEDLE.... at the MARKED LINE....on the “covered
seam-allowance” Side of the Over-Lap Placket (the side I
showed to you in the previous photo).
Start
edge-stitching up to the first “corner”
point......Pivot....stitch to the top of the
“peak”....Pivot....stitch to the final “corner”......

Then
Pivot again and stitch until you reach the Next MARKED LINE....then STOP as shown above.

Now Pivot at the MARKED LINE, and stitch straight across the placket through all layers until you meet the point
where you STARTED stitching.
And
then.....

…..PIVOT again, and edge-stitch all the way down, to finish the placket!
This
is what the finished placket looks like from the Right Side....
(of course, you will most likely be using matching thread..and you will have brushed your chalk line away!)

( Gee whiz...weren't those marked guide-lines handy?)
This is what it looks like from the wrong side--

And this is the placket shown open---

Before applying the cuff, trim the edges of the placket even with the bottom of the sleeve.
And yes of course you may work a buttonhole in the Upper Placket. You can easily do it now, after the cuff is attached, or before the final placket stitching is done. In my shop we work the buttonhole at this stage.
I hope you enjoyed this glimpse into my shirtmaking studio! I have many more "Custom-Shop" Shirtmaking techniques planned to share with you!


